
User Guide for Schools
This page provides guidance for school representatives. It is designed to provide a full explanation of the functionality available and answer many of the FAQs that we receive. We recommend that new users open each of the sections below before commencing activity. If you have a more specific enquiry please make contact with us by using the live chat option on our page or by phoning us on 01329 285415.
Short video tutorials
Adding students/student management
Our approach & course introduction
Student gradebooks
Extensive student learning analysis
Main Functions
It is envisaged that School Representatives will use the system in the following ways:
- Add student users to the school group through the School Management page
- Add teachers to the school group through the Student Management page
- Create classes within your school group
- Assign students and teachers to their necessary classes
- Review the resources contained in the course and direct students to complete specific activities in class or independently for homework
- Review the activity and outcomes within the system and work with students to correct learning gaps
- Generate reports and export files to share with students, colleagues and parents/carers
Getting Started
After signing in the homepage will appear. There are 3 main options contained in the homepage:
- These links navigate the user to the homepage for whichever course is selected
- Access links to 3 Learning Zone homepage reports
- Access to the functionality that allows School Representitive to add students and teachers to the school group, assign users to classes and subscribe students to their courses
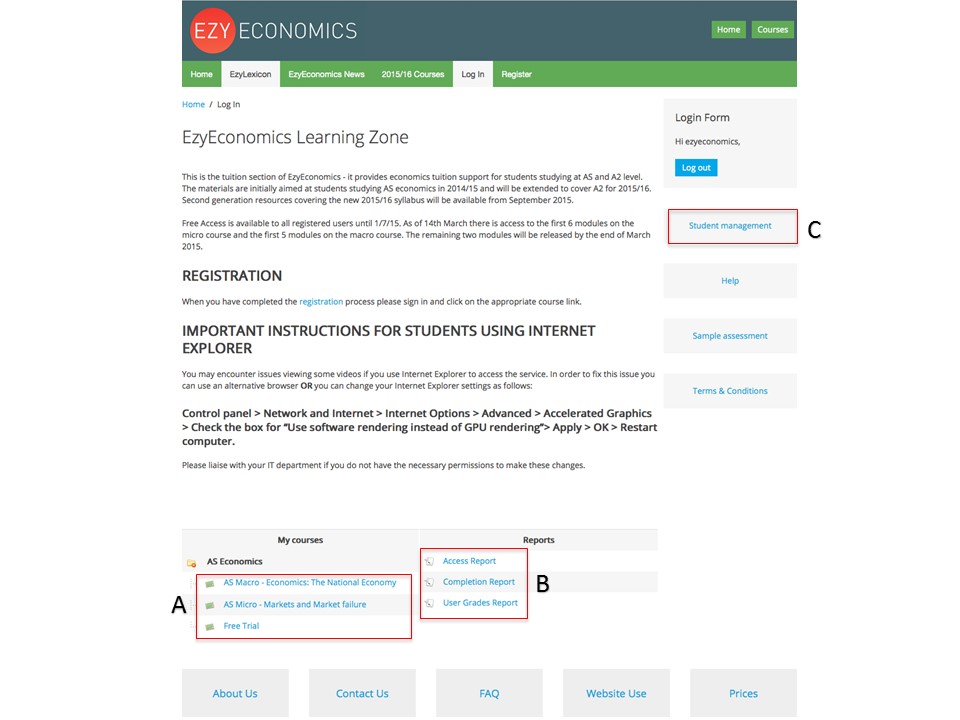
Student Management Section
Students:
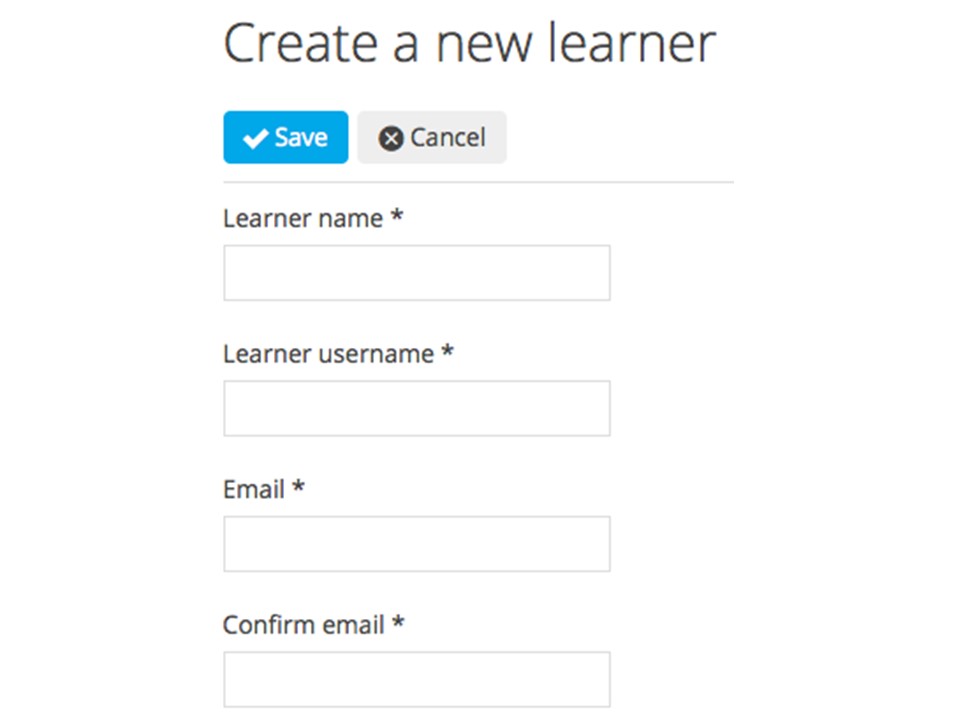
- You will be required to firstly add students when in the student management section of the system. Here you can input student details one by one or you can import a CSV file that you have created in Excel containing the details of all of your students. Doing this will mean that all students will be added simultaneously
1. Adding students one by one:
2. Adding students by importing a CSV file from Excel:
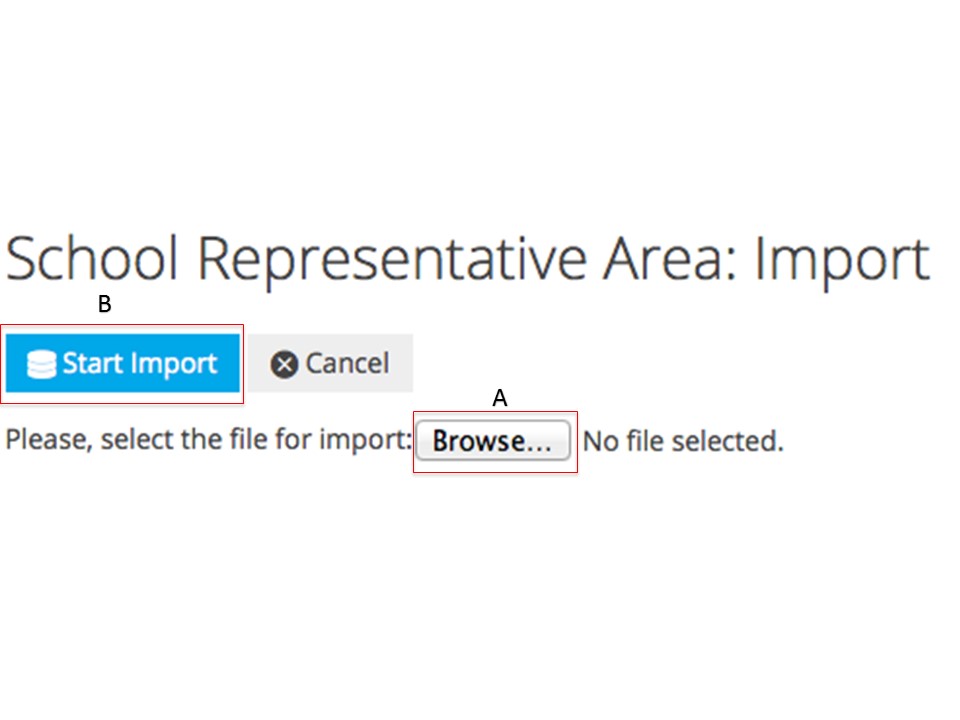
- Browse through your files until you find the correct file
- Click 'Start Import' to begin process
How to create a CSV file in excel:
In the first column your header should be 'Student Name', in the second and third it should be 'Email Address' and the fourth column should be headered 'Type'. In this column you need to enter 's' to signify to the system that the individual is a student.
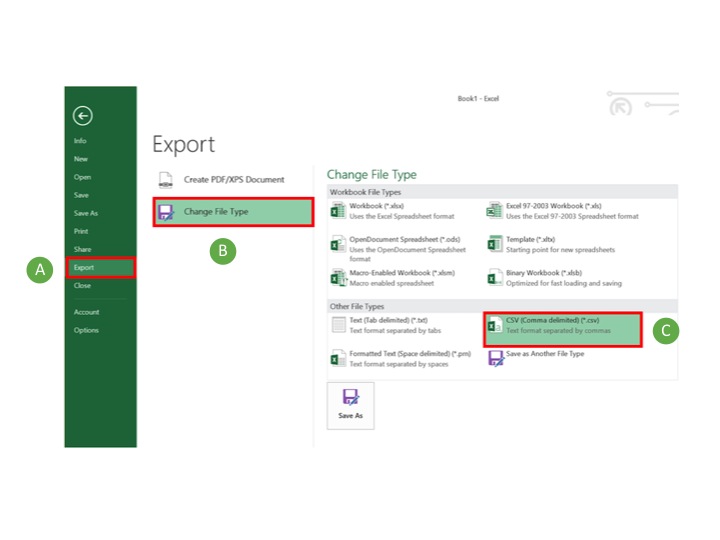
When you have finished save the file in CSV format.
For Windows users this is achieved via file, export (A), change file type (B), select CSV (comma delimited) (*.csv) and then save as.
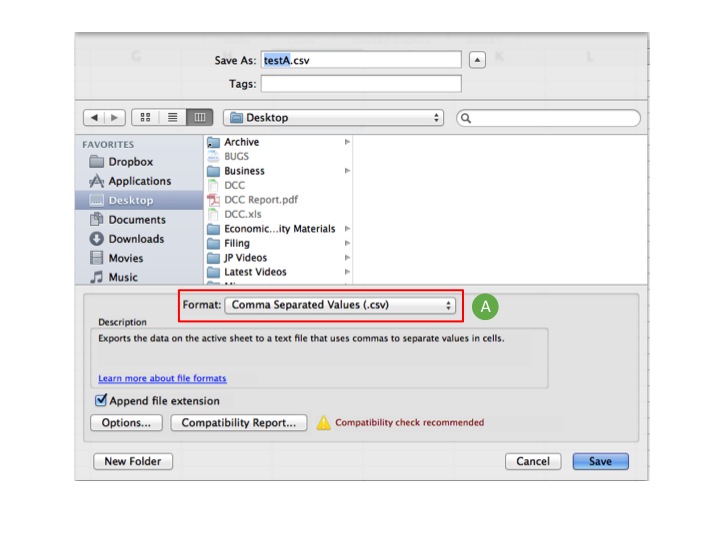
For Mac users this is achieved by selecting save as and adjusting the format to (A) before selecting save:
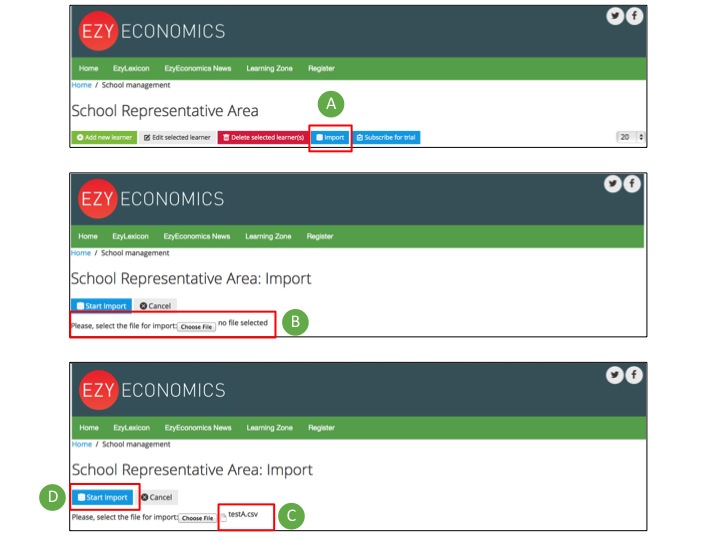
Return to the School Representative Area and select import (A). Use the “choose file” button (B) and then locate and select the CSV file you created (this will take you to the file system within your computer). When this completes the file will be visible (C). Select start import (D) and the users will be created.
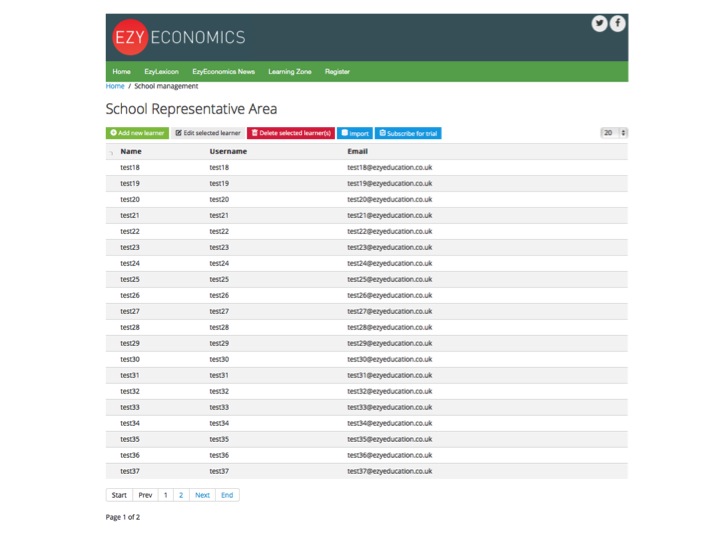
The software will upload the users detailed in your file (see below).
Teachers:
Adding teachers to your school group is a very similar process to adding students. It can either be done by inputting teacher details one by one or by creating a CSV file and importing it to add multiple teachers simultaneously. The only difference with this is that you need to enter 't' into the third column of the CSV file to signify the individual is a teacher.
Classes:
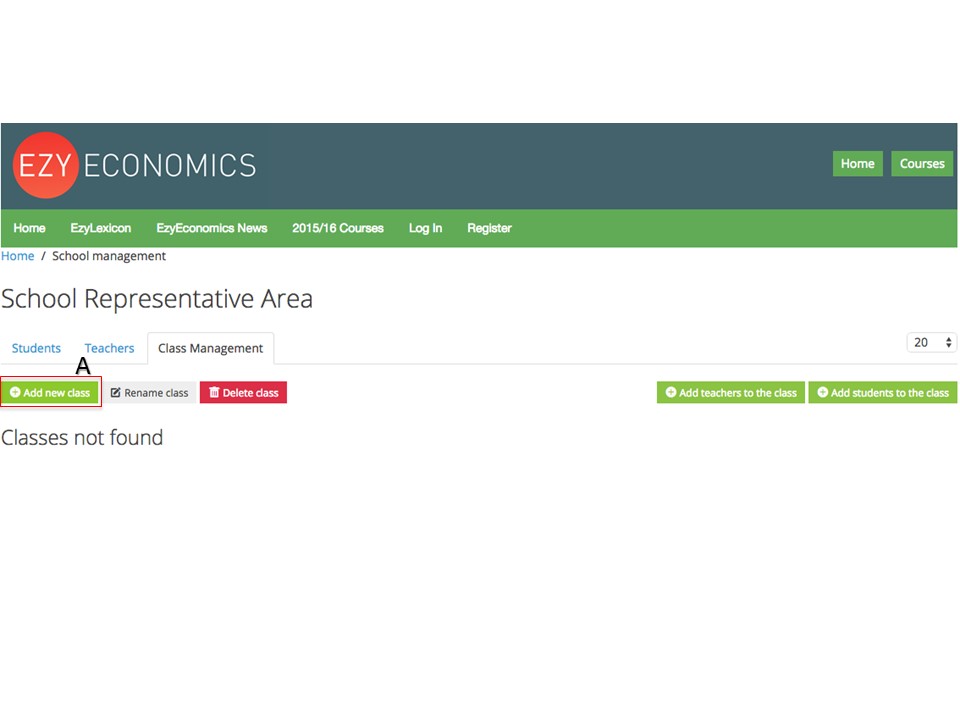
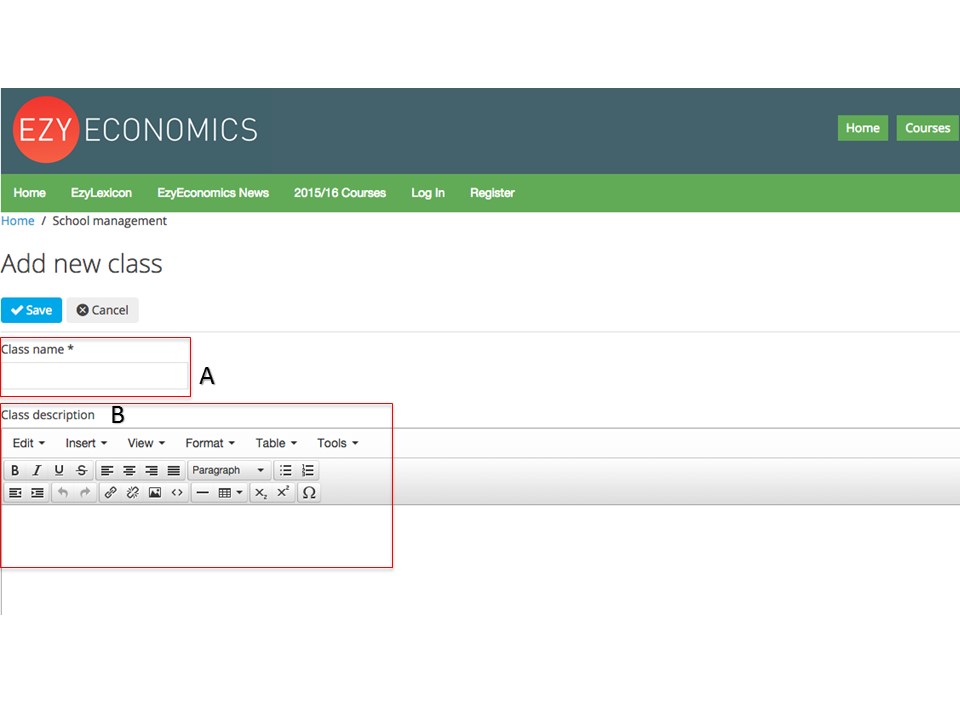
The process of adding classes to your school group is also very simple. Firstly the school rep must click on the 'Add new class' button (A).
You will then be taken through to a page where you will be asked to input the name of the class (A). You will also have the option to add any further details in the class description box (B). Once you have done all you need to do you will need to click the 'Save' button to complete the process.
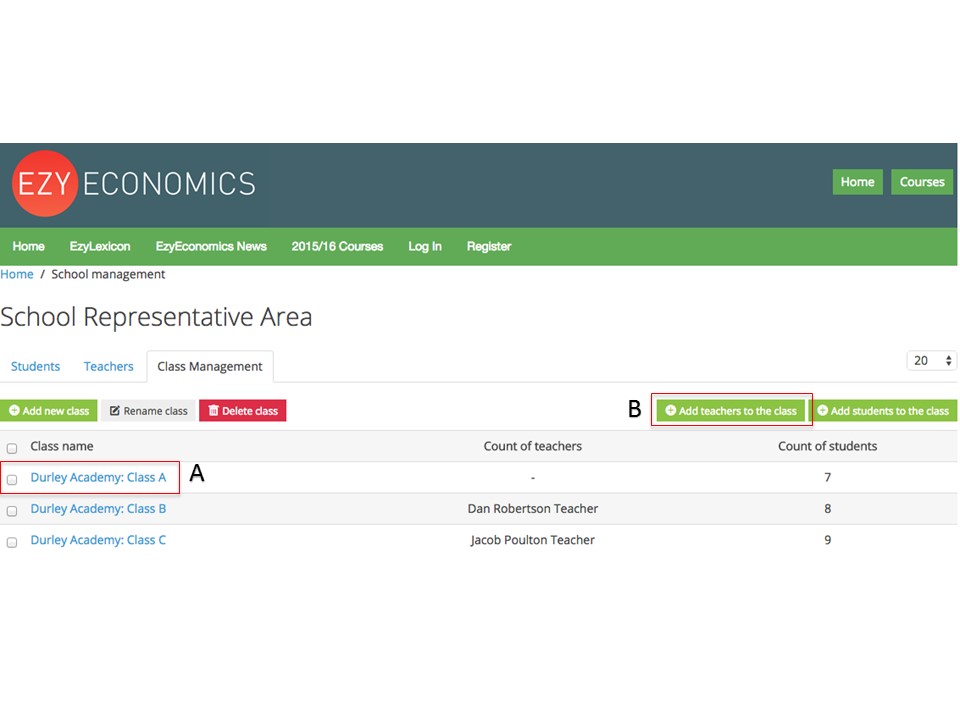
Class Management:
Once teachers have been added to your school group they will need to be assigned to their classes. Teachers can be assigned to more than one class. To add teachers to a class you must:
- Click on the check box of the appropriate class
- Click on the 'add teacher to class' button at the top right hand side of the screen
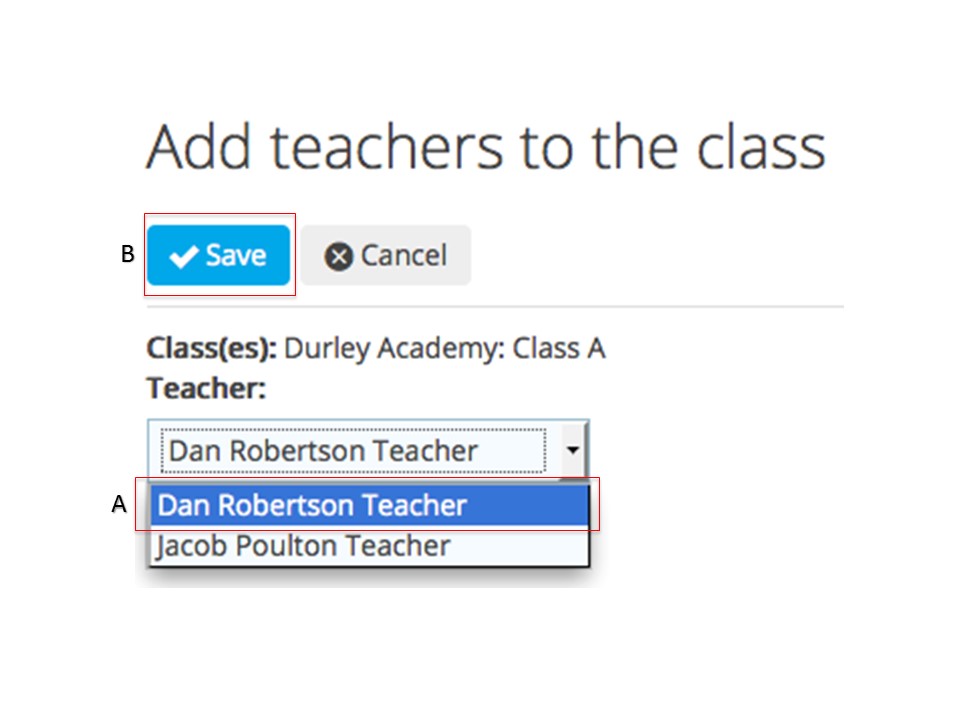
You will then be taken through to a page where you will see a drop down box and in this box there will be a list of your teachers. You must then select the teacher you want to assign to this class.
- Select the teacher you wish to add to the class
- Click on the 'save' button to finish the process
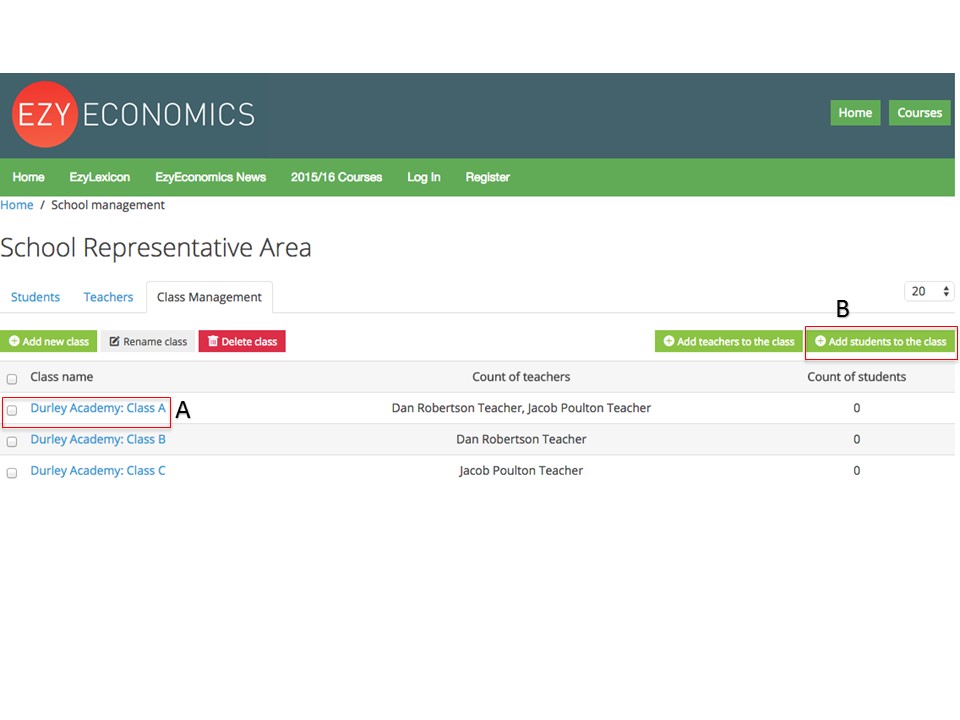
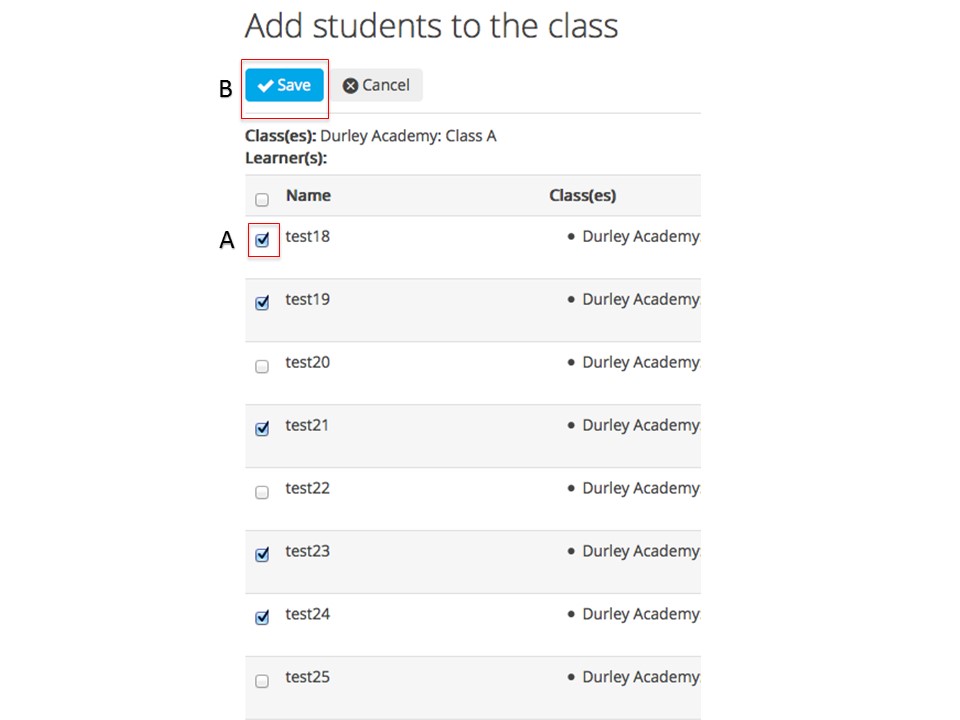
To add students to a class you must:
- Select the class you want to add the student to
- Click on the 'add students to class' button
- You will then be required to select all the students you wish to add to the class
- After selecting the students you will then need to press the 'Save' button to finish off this process
Editing/deleting users, teachers and classes:
- Students
- Within the student management section it is possible for the School Rep to edit student details. This may be necessary if input errors have occurred during the process of adding students onto the system. You will be able to change the name of the user, their username and the email address that is associated with their account
- When a student has reached the end of the course and will no longer require an account to access the content of the website, the school rep will have to delete the user from the school group. To edit and delete a user you simply need to select the user and then either click on the 'edit selected learner' button or 'delete selected learner(s)'
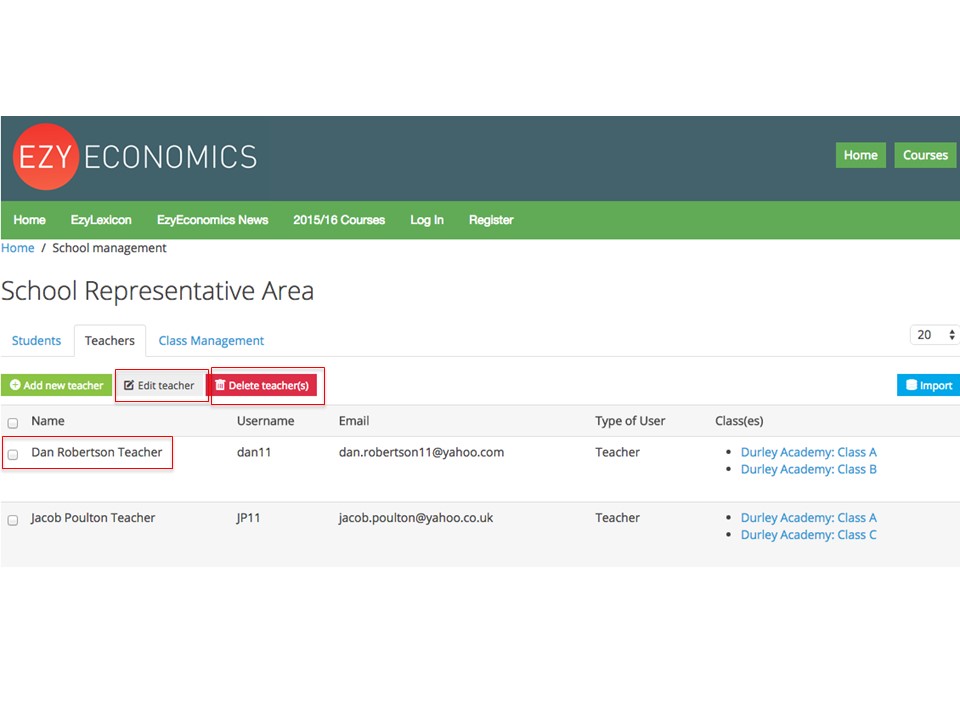
- Teachers
- It is also possible for school reps to edit teacher details within the student management section. Just select the teacher whose details you wish to change and then click in the 'edit teacher' button
- You may also wish to delete a teacher(s) from the school group. To do this select the required teacher and then click on the 'delete teacher(s)' button
Course structure
The economics courses are split into Microeconomics and Macroeconomics. Within these sections we break down the content into modules and units. Each unit has a number of lecture videos with corresponding assessments, and at the end of each module is a 25-mark end of module assessment (EMA).
Assessments can be taken an unlimited number of times, and for each attempt the questions and answers in the quiz will be randomised.
EzyLexicon
The EzyLexicon is a glossary of terms which aims to cover all definitions referred to in the A-level syllabus plus many more. It currently contains definitions to over 800 terms and is continually expanding.
EzyEconomics News
This is the EzyEconomics blog. During the school/college year we regularly post video blogs focussing on on current economic events and relate these to the theory covered by the courses we offer.
Digital Records
The system records every action taken by every user. The School Representative has access to the data for all users within their school group and Teachers can access the data of the classes that they have been assigned to. The system records:
- Duration of time spent on any given activity
- The user answer and correct answer for every quiz question attempted, together with the total score and grade achieved on each quiz
- The system also records all duplicate attempts
All activity is recorded and can be found in the gradebook and tracking sections once you are logged in. There is no need for any input of data by the school rep. The main role of the school rep is to direct activity to students, monitor progress and transfer data to the school/college system if this is necessary.
How do I find my students' gradebook?
The gradebook reveals the grades achieved in a certain course by all the students within your school group.
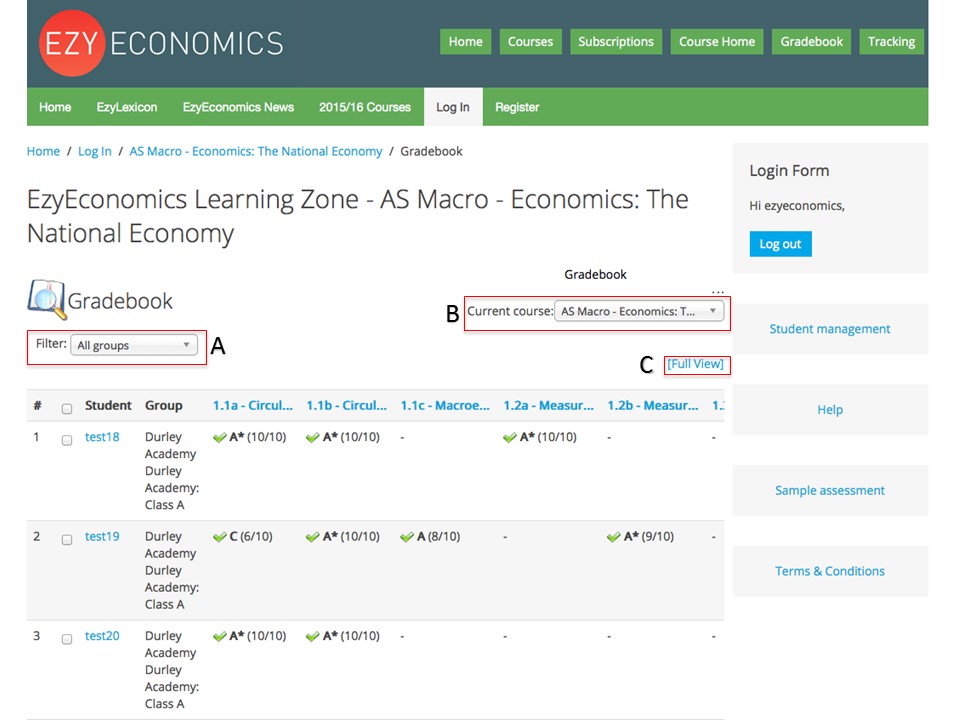
From this page you can:
Filter between each of your classes

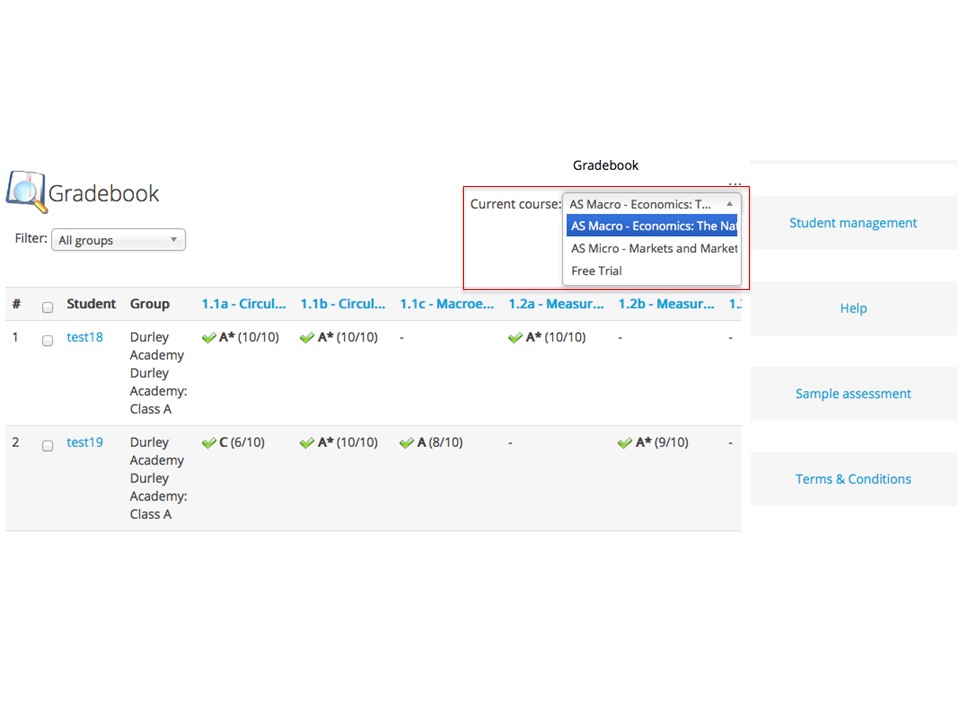
Switch between courses
Export a CSV or XLS file
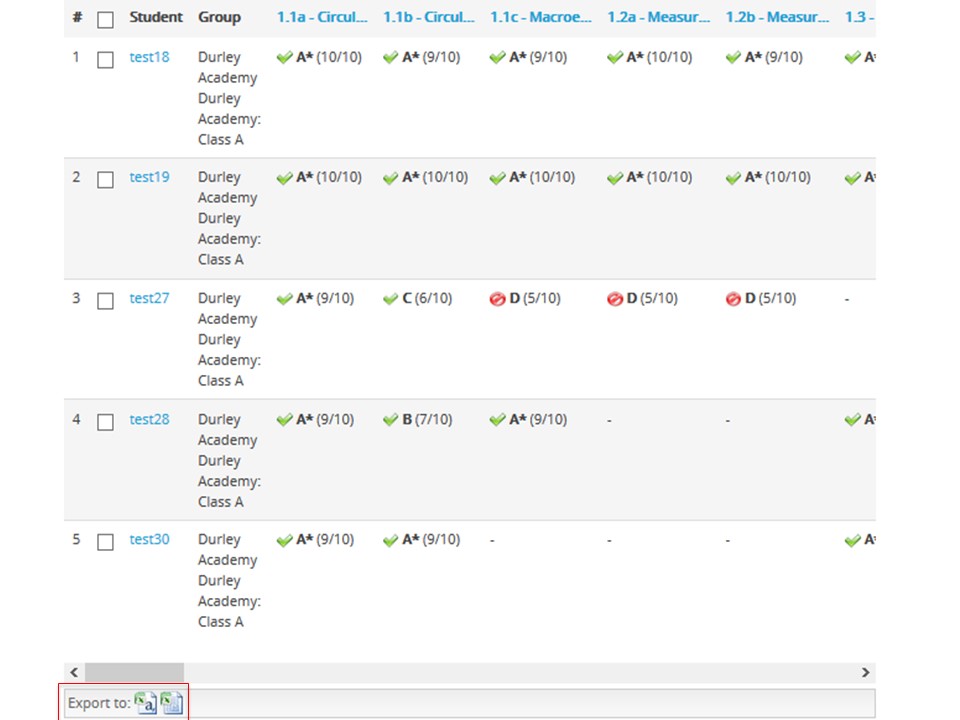
You can also view the gradebook for an individual student. This is done by clicking on the link attached to the Username under the column 'Student'.
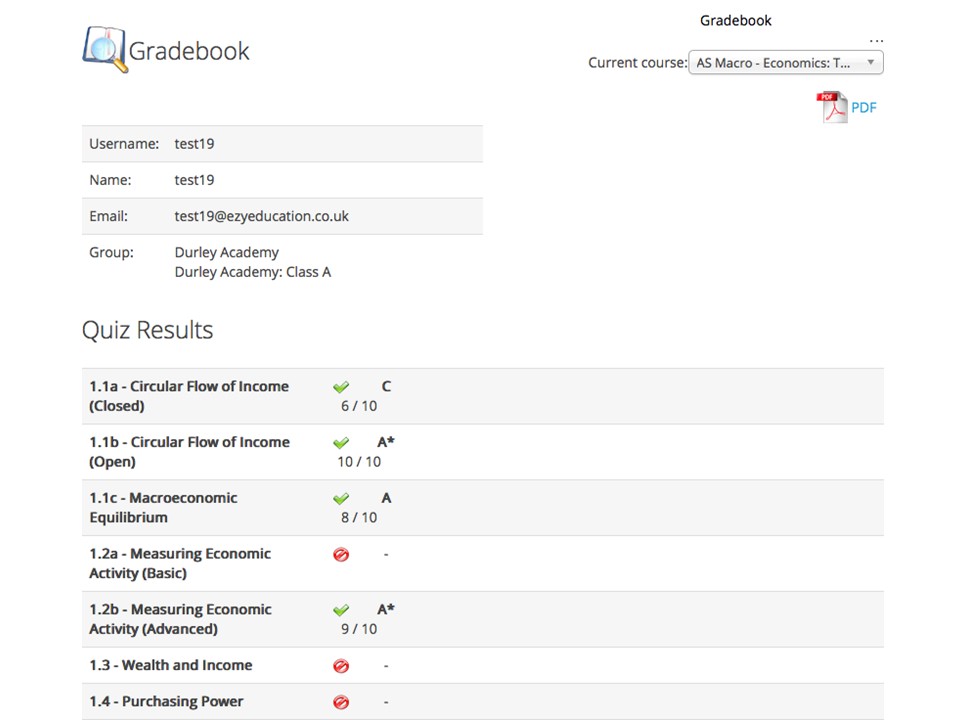
Once you have selected an individual student, you can create a PDF of their gradebook by using the link in the top right of the page. The PDF is colour coded in a clear structure that makes it useful to easily pinpoint problems areas and summarise achievement within an academic term or year.
Using tracking to view student activity
The tracking page gives you access to 8 different types of activity report:
- Learning path statistics - details which learning paths have been started and indicates which learning paths have been completed. This provides a good, high level view of course coverage
- Activity levels - provides a more detailed view of activity and details every activity undertaken in chronological order. This provides insight into learning patterns and current activity levels
- Quizzes status report - provides details of which users have completed each quiz and the most recent outcome they have achieved.
- Quiz outcomes - a highly detailed page showing records of all student attempts at quizzes including information on number of attempts at a quiz, score achieved on each attempt and time spent on each attempt. This function also gives you the option to review the answers given by each student on each attempt. You can filter this information by class, individual and quiz.
- Answer analysis - provides details and analysis of quiz performance showing you the % of students that selected each option for each question.
- Personal report - a pdf download of the personal report for students. Gives details of the scores achieved at most recent attempt of a quiz as well as time spent on the attempt of a quiz and video view duration. This is presented and colour coded in a similar way to the gradebook.
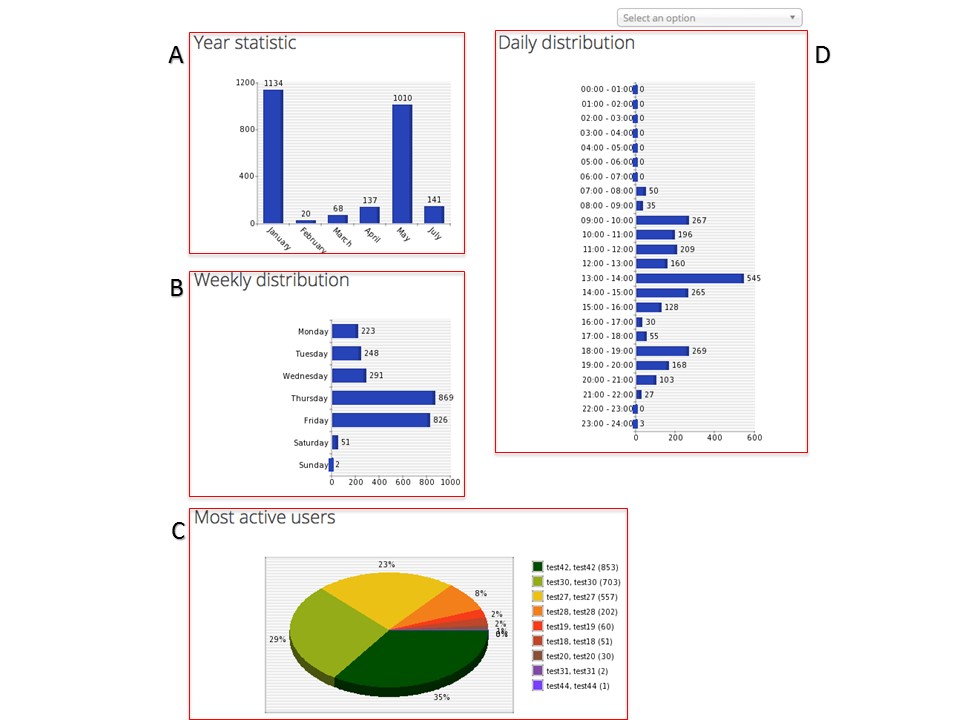
The second half of the tracking page details various statistical summaries based on the measurement and analysis of clicks by each user:
- Year statistics (A) - provides a monthly distribution of system actions taken by users (please note the graphic will extend to include additional months)
- Weekly statistics (B) - provides insight into preferred study days
- Most active users (C) - provides an insight into the activity of individual students. It shows the 10 most active users
- Daily distribution (D) - provides an insight into preferred study times
Is there a time limit on access?
A subscription provides access to the service for 12-months. Towards the end of this period we will issue an invoice for you to renew your subscription. If payment is not received by the due date of the invoice then access will be cut off until a payment is received.
Can I use a tablet or touch screen to access the service?
The service uses a flexible template which means that is can be accessed using most devices. We have many iPad/ tablet using schools successfully using the service. Most large screen mobile phones can be used to access the service, but in some cases the overall experience may be compromised slightly.
Do I need any IT expertise or training to use the service?
No. The service has been designed to be simple and intuitive. As with many digital services/ apps it is simply a case of looking around and experimenting and you will quickly find your way around the system. If you would like any support with getting to grips with the service, please feel free to give us a call or an email to arrange a time to run through a quick demo over the phone.
How do I buy a subscription?
Towards the end of your trial period you will be issued with an invoice. If you wish to go ahead and purchase a subscription then you must let us know your intentions and either send us a purchase order or make a payment. If we do not hear from you then student access will be cut and limited to just EzyEconomics News and the EzyLexicon.
If you decide you would like to purchase a subscription before the end of your trial then simply make contact with us via email/ telephone to request an invoice.
Can students share their sign on?
No, this is prohibited by out terms and conditions and we reserve the right to withdraw access to the service if there is any evidence of this type of activity. Moreover, this will tamper with the consistency of each students' personal records and data.
Will users be exposed to contact with other users?
No, the service does not provide any mechanisms for independent users to communicate with other users.
Terms of website use
These terms together with the Acceptable Use Policy and Cookies Policy apply to anyone (guests as well as registered users) using our website. The use of this site will be deemed acceptance of the Terms of Use. Anyone not agreeing to these terms of use must not use our site.
Privacy and Cookie Policy
We take the privacy of your personal data very seriously and require acceptance of this policy to make sure that all users understand our views and practices regarding your personal data and how we will treat it.
Acceptable Use Policy
This sets out the ways in which our website may be used and details prohibited uses of our site. It applies to all users of the site whether as a visitor or a registered user.